How To Graft Apple Trees: 4 Proven Methods Step-by-Step
Learning how to graft apple trees is much easier once you stop treating every graft as the same job. A pencil-thick rootstock calls for a different cut than an old branch. Spring grafting uses dormant scion wood, while summer budding uses a single developing bud. The right method depends on the size of the stock, the season, and what you are trying to achieve.
Table of Contents
If you are starting with a young rootstock, whip-and-tongue grafting is the most practical place to begin. If you are changing the variety on an established tree, cleft or bark grafting usually makes more sense. T-budding is another proven option when the rootstock is actively growing, and the bark lifts cleanly.
This guide walks through all four methods, explains when to use each one, and shows the details that matter most: dormant scion wood, cambium contact, tight wrapping, moisture control, and aftercare.
Quick answer: how do you graft an apple tree?
Apple grafting joins a scion from the variety you want to keep with a compatible rootstock or established apple tree. The scion becomes the fruiting top, while the rootstock provides the roots and influences tree size, vigor, anchorage, and other growth characteristics.[1][7]
For a basic spring graft, collect healthy one-year-old scion wood while it is dormant, keep it cool and moist, make matching cuts on the scion and stock, align the cambium, secure the union, and protect exposed cut surfaces from drying. Whip-and-tongue grafting works best when the stock and scion are close to the same diameter.[1]
The most important rule is simple: the cambium of the scion must contact the cambium of the stock. You do not need the bark edges to look perfectly even if the pieces are different sizes. You do need living cambial tissue to meet on at least one side so the union can heal.[2]
Why apple trees are grafted instead of grown true from seed
Apple seedlings are genetically different from the tree that produced the fruit. Planting a seed from a favorite apple does not reliably reproduce that named variety. Grafting solves that problem by using vegetative wood from the tree you want to copy.[7]
That is also why the rootstock and the scion have separate jobs. The scion carries the identity of the fruiting cultivar. The rootstock influences the mature size and growth behavior of the tree. If you are still choosing the lower half of the tree, start with our guide to apple tree rootstocks. For compact trees, our M9 rootstock apple tree guide explains a strongly dwarfing option. For a wider semi-dwarf choice, see the guide to MM106 rootstock.
If your real question is whether you can skip grafting and root a piece of apple wood directly, read apple tree propagation from cuttings. If you want to understand what happens when you start with a seed instead, see growing an apple tree from seed.
When to Learn How to Graft Apple Trees for the Best Results
For most home-garden spring grafts, the scion is collected while fully dormant and kept refrigerated until grafting time. Iowa State Extension recommends dormant scion wood from the previous year’s growth for whip-and-tongue grafting. University of New Hampshire Extension likewise recommends collecting straight, smooth, pencil-thick scion wood while trees are dormant and storing it cool until spring grafting.[1][2]
Spring is the main window for whip-and-tongue, cleft, and bark grafting. Budding is different. University of Minnesota describes bud grafting of apples in late summer, with most work occurring in August and September in its breeding program. Missouri Extension also describes T-budding as a warm-season propagation method.[6][4]
Do not use calendar dates blindly. Dormancy, bud development, local frost timing, and whether the bark is slipping matter more than a fixed date. The practical goal for spring grafting is to work with dormant scion wood and a stock that is entering active growth without letting the scion dry out or break bud too early.
Tools and materials you need
- A healthy, compatible apple rootstock or established apple branch
- Dormant scion wood from the apple variety you want to propagate
- A very sharp grafting knife
- Hand pruners for preparing scion wood
- Grafting tape, budding rubber, or another suitable graft wrap
- Grafting compound or wax when the method leaves exposed cut surfaces that need sealing
- Labels and a weather-resistant marker
- A clean bag and slightly damp packing material for temporary scion storage
A sharp knife is not optional. Smooth cuts fit together better than crushed or ragged cuts, and grafting becomes harder when a dull blade forces you to saw at the wood. University of New Hampshire calls a sharp knife the most important grafting tool, while Iowa State recommends smooth, even cuts made with a sharp knife.[2][1]
If you are assembling a kit from scratch, our upcoming guide to the best grafting tools for apple trees covers the practical differences between knives, tapes, compounds, and grafting aids.
Safety note: grafting knives are extremely sharp. Work on stable wood, keep your free hand out of the cutting path, and cut away from fingers and body whenever the technique allows. Practice each cut on spare twigs before working on valuable scion wood.
How to Graft Apple Trees: Choose the Right Method
| Method | Best use | Stock and scion size | Typical timing |
|---|---|---|---|
| Whip-and-tongue | Making a new tree on young rootstock | Similar diameter, often pencil-thick | Late winter to spring |
| Cleft graft | Top-working a larger branch or older tree | Stock much larger than scion | Spring |
| Bark graft | Adding scions to a larger limb or trunk | Stock much larger than scion | Spring when bark lifts readily |
| T-budding | Propagating with a single bud | Young actively growing stock | Summer |
Missouri Extension groups spring grafting methods by the size relationship between stock and scion, and University of New Hampshire gives detailed apple-specific guidance for whip-and-tongue, cleft, and bark grafting.[3][2]
Method 1: Whip-and-tongue grafting for young apple rootstock
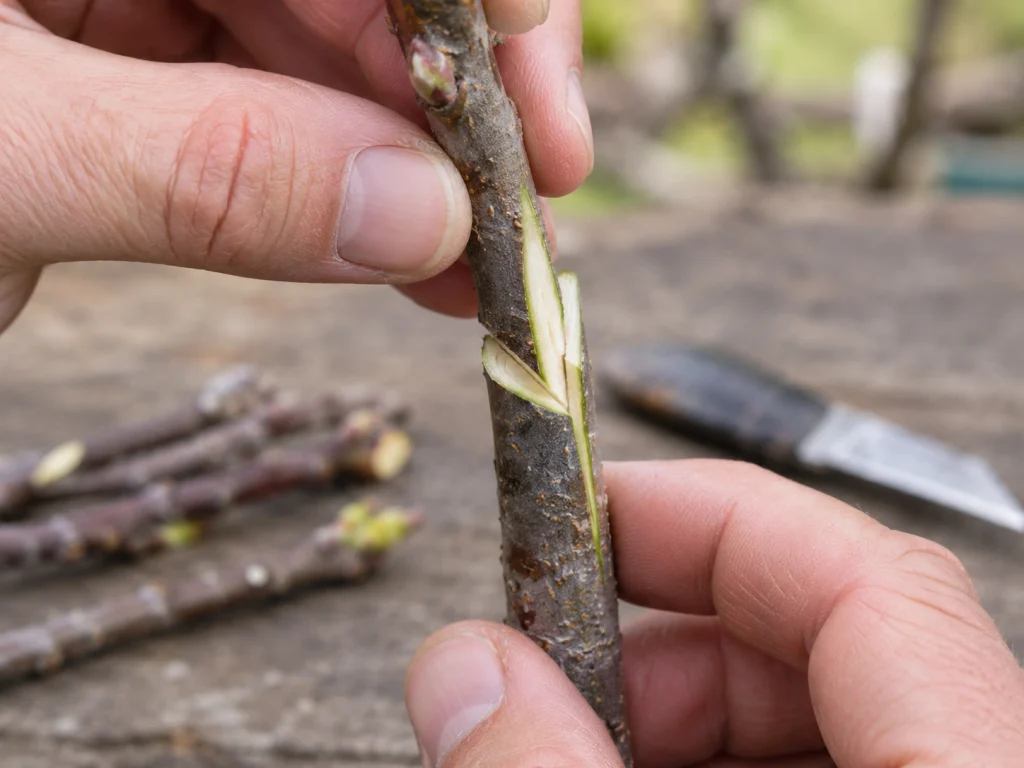
Whip-and-tongue is a strong choice when the scion and rootstock are close to the same diameter. Iowa State recommends stock and scion between about 1/4 and 1/2 inch in diameter for this method.[1]
Step 1: Match the scion and rootstock
Choose straight sections that are as close in diameter as possible. Exact matching makes cambium alignment easier and gives the union more contact area.
Step 2: Make the first diagonal cut
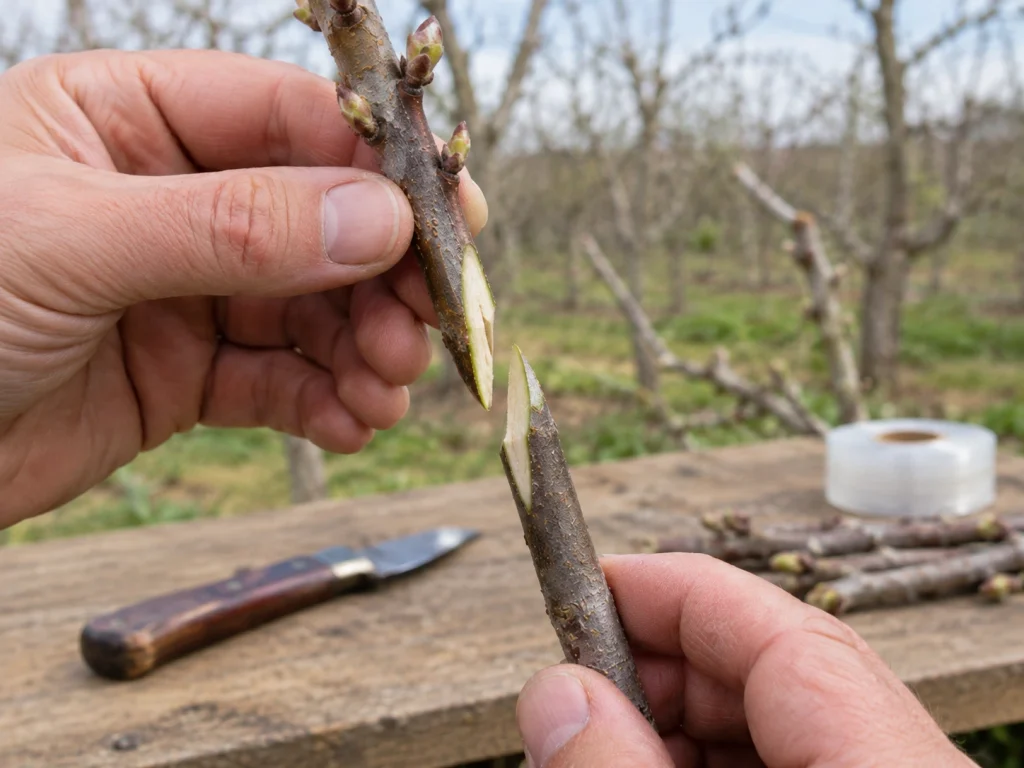
Make a smooth diagonal cut across the rootstock about 1 to 2 inches long. Make a matching diagonal cut on the base of the scion. Avoid repeated trimming if you can. One clean cut leaves a flatter mating surface.[1]
Step 3: Cut the tongues
Starting roughly one-third of the way down each cut face, make a short cut into the wood to create a tongue. The matching tongues should let the two pieces slide together and lock.[1]
Step 4: Interlock the pieces and align cambium
Slide the scion and rootstock together. If the diameters match, the bark edges may line up on both sides. If they do not, shift the scion so the cambium lines up on at least one side rather than centering the scion and missing cambial contact altogether.[2]
Step 5: Wrap and seal
Wrap the union firmly enough to stop movement without crushing the tissues. Iowa State recommends grafting tape or similar wrapping and sealing the union and cut end of the scion with a suitable grafting compound.[1]
Step 6: Label the graft
Write the cultivar and grafting date on a durable label. This sounds trivial until you have several dormant scions that look identical.
Method 2: Cleft grafting for a larger branch or older apple tree
Cleft grafting is useful when the branch or trunk you are grafting onto is much larger than the scion. University of New Hampshire recommends it for top-working older trees when you want to change the variety growing on an established framework.[2]
Step 1: Choose a sound branch or stock
Use healthy wood with solid bark and no obvious rot at the grafting point. A graft cannot repair decayed structural wood.
Step 2: Cut the stock cleanly
Saw the selected stock or branch off squarely. The final surface should be clean enough to split without tearing loose strips of bark.
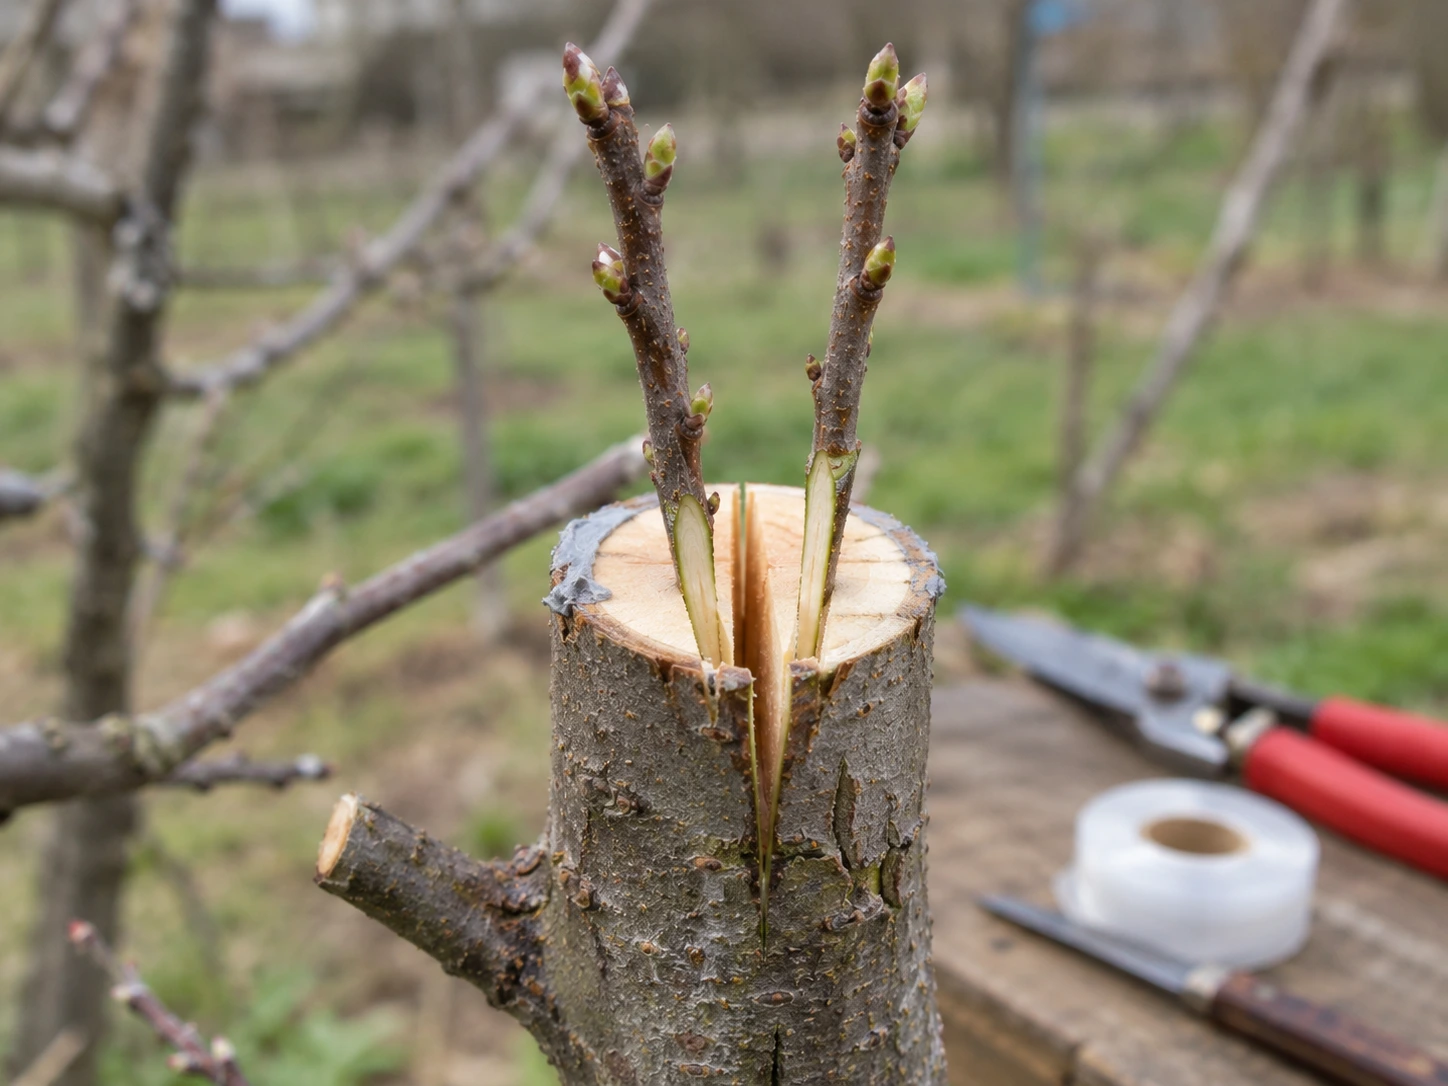
Step 3: Make the cleft
Split the center of the cut stock with an appropriate cleft grafting tool or similar tool. Hold the cleft open while you prepare and place the scions.[2]
Step 4: Shape the scions
Use pencil-thick, one-year-old scion wood and shape the lower end into a long wedge. University of New Hampshire recommends preparing the wedge so one side is slightly thicker, with that thicker side facing the outside of the stock.[2]
Step 5: Insert scions at the outer edges
Place a scion near each side of the cleft. The goal is not to center the scion in the split. The goal is to line up the cambial zone of each scion with the cambial zone just inside the stock’s bark.[2]
Step 6: Seal every exposed cut surface
Cover the cleft, cut top, and exposed wood with grafting compound so the tissues do not dry out. Recheck the seal during the first days and repair cracks if they appear.[2]
Method 3: Bark grafting for large limbs in spring
Bark grafting is another top-working technique for stock that is much larger than the scion. It is especially useful when the branch is too large for a simple whip graft, and the bark can be lifted cleanly from the wood. University of New Hampshire describes bark, or inlay, grafting as an option for larger stock after the main stock is cut back.[2]
Step 1: Prepare the branch
Cut the branch back to sound wood and make a clean, flat surface. Use this method only on healthy structural wood.
Step 2: Prepare the scion
Cut the base of the scion to create a long, flat contact surface. University of New Hampshire’s inlay method uses a prepared scion that can sit tightly against the wood beneath the stock’s bark.[2]
Step 3: Open the bark
Make a vertical incision through the bark to the wood. Carefully lift the bark flap without stripping it farther than needed.
Step 4: Seat the scion
Slide the cut face of the scion against the exposed wood so the scion’s cambium contacts the stock’s cambial region. The fit should be snug and stable.
Step 5: Secure and seal the graft
Fasten the scion so it cannot shift, then seal exposed cut surfaces to limit drying. On a large stock, more than one scion may be placed around the circumference as part of top-working.[2]
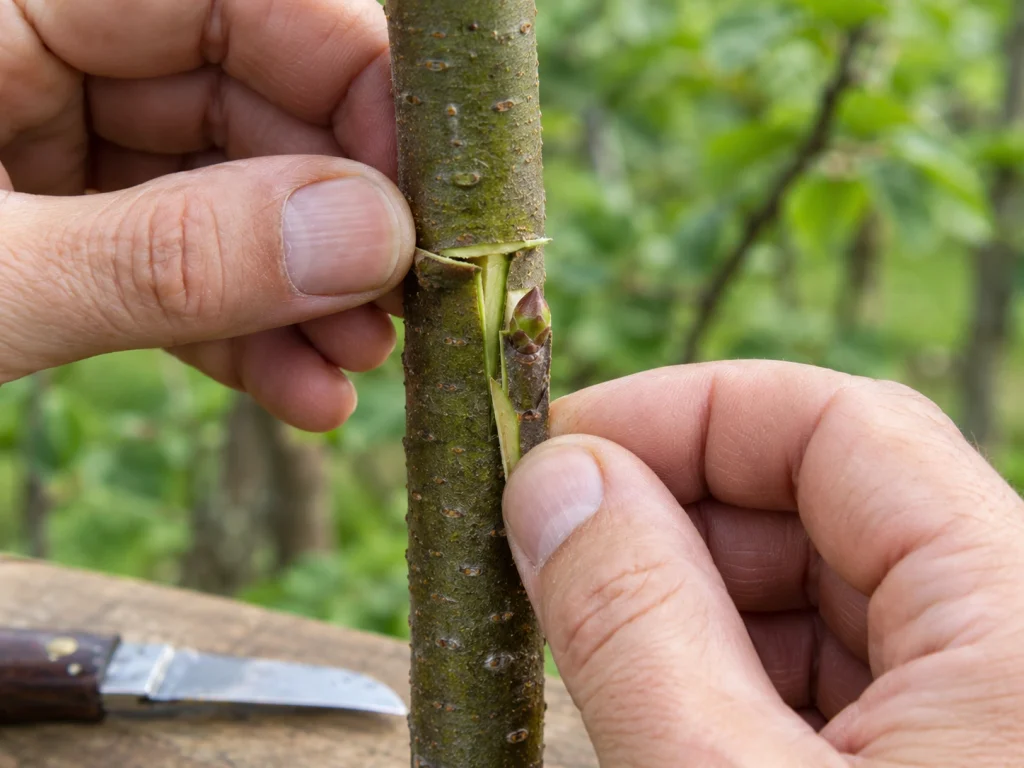
Method 4: T-budding for summer apple propagation
T-budding uses one bud instead of a section of dormant twig. Missouri Extension defines budding as a form of grafting in which the scion is a single bud. University of Minnesota uses bud grafting in apple breeding work and describes the practical sequence clearly.[4][6]
Step 1: Collect current-season budwood
Choose healthy current-year growth from the variety you want. Remove the leaves while keeping the buds intact.
Step 2: Remove a bud shield
Use the grafting knife to remove a single bud with a thin shield of surrounding tissue. Avoid touching or drying the cut surface more than necessary.
Step 3: Make a T-shaped cut in the rootstock
Cut a short T into the rootstock bark, deep enough to reach the cambial area without gouging deeply into the wood. Gently lift the bark edges.[6]
Step 4: Slide the bud into position
Insert the bud shield under the loosened bark and line it up closely with the top of the T. Good contact between living tissues is the goal.[6]
Step 5: Wrap the bud
Secure the graft with budding rubber or grafting strip so the bud shield stays in close contact with the rootstock. Keep the bud itself exposed if your chosen wrap and technique call for it.
Step 6: Cut back the rootstock after the bud has established
University of Minnesota describes overwintering newly budded trees, then cutting the rootstock back above the successful graft the following spring so the selected bud becomes the new top.[6]
How to store apple scion wood before grafting
Scion storage is one of the places beginners lose good material before a graft is even made. Collect dormant, healthy one-year-old shoots. Keep them cool, enclosed, and slightly moist so they do not dry out, but do not leave them wet enough to rot. Iowa State and the University of New Hampshire both recommend refrigerated storage for dormant apple scion wood until grafting time.[1][2]
Label each cultivar before it goes into storage. Do not rely on memory. Once the leaves are gone, many scion sticks look almost identical.
Aftercare: what to do after the graft is made
Keep the union from drying out
Wrapping and sealing are meant to hold the pieces together and conserve moisture while the union heals. Inspect the graft after wind, temperature swings, or heavy rain and repair a damaged seal when needed.[2]
Remove competing growth below the graft
Shoots growing from the stock below the graft compete with the scion. Missouri Extension recommends removing side shoots or competing twigs after the graft has taken and growth begins.[3]
Protect vigorous new shoots
Successful top-worked grafts can grow strongly, but young unions remain vulnerable to breakage. University of New Hampshire notes that new grafts can be brittle for several years, which makes training and support important.[2]
Do not rush to remove support
Follow the instructions for the specific tape or budding material you used. Some products stretch or degrade; others must be removed before they constrict the growing stem. The correct timing depends on the material and the vigor of the graft.
7 common apple grafting mistakes to avoid
- Using scion wood that has already broken dormancy. Spring grafting is easier when the scion is still dormant and has been stored properly.[1]
- Letting scion wood dry out. Dormant scions should be kept cool and moist in storage, not left exposed on a bench or in a warm room.[2]
- Centering a small scion on a large stock. Cambium alignment matters more than visual symmetry. Shift the scion toward one side when needed.[2]
- Making rough cuts with a dull knife. Smooth cuts create better mating surfaces and are easier to align.[1]
- Choosing the wrong method for the size difference. Whip grafts suit similar diameters; cleft and bark grafts are better choices when the stock is much larger.[3]
- Leaving exposed wood unsealed where the method requires sealing. Large cleft and bark grafts can lose moisture rapidly through cut surfaces.[2]
- Ignoring shoots below the graft. Competing stock growth can divert vigor away from the scion and should be managed after the graft begins growing.[3]
How to improve your odds on the first attempt
Practice the cuts before you touch your best scion wood. A handful of disposable apple or crabapple twigs can teach you more about knife angle, pressure, and matching surfaces than rereading the instructions ten times.
For a first spring graft, keep the job simple. Use a young apple rootstock and scion of similar diameter, then try whip-and-tongue grafting. Utah State Extension notes that bench grafting is often a successful approach for hobbyists and novices, while commercial nurseries also use budding techniques for apple propagation.[9]
Make more than one graft when preserving a rare or sentimental variety. Grafting is a biological process, not a guaranteed mechanical joint. Having a second scion gives you another chance if one union fails.
FAQs
Can you graft more than one apple variety onto the same tree?
Yes. University of New Hampshire notes that grafting can be used to create trees with several varieties or to add a new variety to an existing orchard tree.[2]
Can you graft an apple scion onto a pear tree?
For home orchard work, do not plan on apple-to-pear grafting. University of New Hampshire advises that fruit-tree grafting is generally limited to closely compatible material and specifically notes that apple scions should not be grafted onto pear rootstock.[2]
What is the easiest graft for a beginner?
When the scion and young rootstock are close to the same diameter, whip-and-tongue grafting is a practical beginner method with detailed home-garden guidance from Iowa State Extension. If you are uncomfortable making the tongue cuts, practice first on spare shoots until the pieces lock together cleanly.[1]
Do I need grafting wax?
How do I know whether the graft worked?
Successful scion growth is the clearest practical sign, but do not disturb the union just because buds begin to move. Keep competing stock shoots under control and protect the new growth while the graft strengthens.
Final takeaway
The hardest part of apple grafting is choosing the right method before the knife touches the tree. Use whip-and-tongue for similar, pencil-sized pieces. Use cleft or bark grafting when an established branch is much larger than the scion. Use T-budding when you are propagating with a single bud during active summer growth.
Whichever method you choose, the same fundamentals keep showing up: healthy compatible plant material, good timing, smooth cuts, cambium contact, a stable union, moisture protection, and careful aftercare. Get those details right, and grafting becomes a repeatable orchard skill rather than a mysterious trick.
Sources
- Iowa State University Extension, Whip and Tongue Grafting of Apple Trees
- University of New Hampshire Extension, Growing Fruit: Grafting Fruit Trees in the Home Orchard
- University of Missouri Extension, Grafting
- University of Missouri Extension, Budding
- West Virginia University Extension, Grafting as Plant Propagation
- University of Minnesota Extension, Fruit Update: Bud Grafting at the Horticultural Research Center
- North Carolina Cooperative Extension, Why We Use Apple Rootstock
- University of Maryland Extension, All About Apple Rootstocks
- Utah State University Extension, Small Acreage Fruit FAQs